 Uneven Temperatures Between Rooms
A hallmark of insufficient insulation is the puzzling phenomenon of uneven temperatures throughout a home. Ideally, your living space should maintain a consistent temperature from room to room. However, if you find that some areas are notably colder or warmer than others, it’s a strong indication that your insulation is not performing as it should. This inconsistency can turn what should be a comfortable home into a patchwork of microclimates, requiring blankets in one room and fans in another.
Why It Happens
The underlying cause of these temperature discrepancies is often poor or degraded insulation. Insulation that is unevenly distributed, has settled over time, or was never adequately installed can lead to significant differences in how heat is retained or repelled in various parts of your home. External walls, attics, and basements are typical culprits for these leaks. In winter, heat escapes from under-insulated areas, leaving some rooms cold. In summer, heat penetrates these weak spots, making certain rooms uncomfortably warm.
Quick Test for Homeowners
To identify if uneven temperatures in your home are due to insulation issues, consider this simple checklist:
- Thermal Hand Test: On a cold day, use your hand to feel the walls, ceilings, and floors in different rooms. Areas that feel notably colder may be under-insulated.
- Visual Inspection: Look for visible signs of insulation problems, such as uneven attic insulation, gaps around windows and doors, or old insulation materials that may have degraded over time.
- Thermometer Check: Use an indoor thermometer to measure and compare the temperature in different rooms. A variance of more than a few degrees suggests an issue.
- Draft Detection: On a windy day, hold a thin piece of tissue paper around windows, doors, and wall outlets. Movement indicates drafts that could be symptomatic of poor insulation.
Addressing uneven insulation not only improves comfort but can also reduce your energy bills by ensuring your heating and cooling systems operate more efficiently. If your assessment suggests inconsistent insulation, it may be time to consult with a professional to identify the best solutions for your home.
Cold Walls, Floors, and Ceilings
A simple yet effective way to gauge your home’s insulation health is through the “touch test.” This method can quickly reveal if your insulation is lacking, simply by feeling the temperature of your walls, floors, and ceilings. Ideally, these surfaces should feel warm and dry to the touch, signifying that the insulation is effectively keeping the interior temperature stable and preventing the outside cold or heat from seeping in.
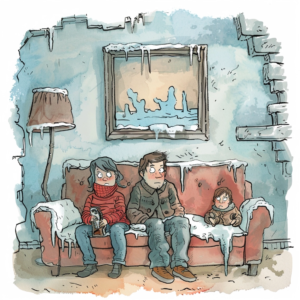 How the Touch Test Works
To perform the touch test, wait for a day when there’s a noticeable temperature difference between the inside and outside of your home. Then, place your hand against various surfaces:
- Walls: They are the barrier between you and the external temperature. If they feel cold in winter or overly warm in summer, it’s a sign that the insulation may be inadequate.
- Floors: Especially those above unheated spaces like garages or basements, should be insulated to feel warm and dry. Cold floors can indicate missing or insufficient insulation below.
- Ceilings: Pay particular attention to the ceilings below the attics. Cold spots here can reveal where heat is escaping in the winter, suggesting poor attic insulation.
Why Warm and Dry Matters
Surfaces that are warm and dry indicate that the insulation is effectively preventing heat transfer. This means your heating or cooling system doesn’t have to work as hard to maintain a comfortable indoor environment, leading to lower energy consumption and costs. Moreover, adequate insulation helps prevent moisture condensation, which can lead to mold growth and deteriorate building materials over time.
Insulation acts as a thermal barrier, and its effectiveness is crucial for maintaining an energy-efficient, comfortable home. If the touch test reveals cold walls, floors, or ceilings, it may be time to consider upgrading your insulation. Not only will this improve your comfort and reduce your energy bills, but it will also protect the structural integrity of your home from moisture damage.
 Ice Dams on the Roof
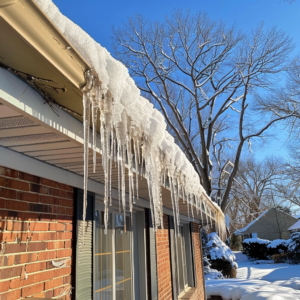
Ice dams are a common winter phenomenon that can signal insulation problems in your home, particularly in the attic. They form when heat from the inside of your home escapes through the roof, melts the snow on the roof’s surface, and then refreezes at the roof’s edge, creating a dam of ice. This cycle is not just a testament to the marvels of nature but a clear sign that your home’s insulation and ventilation systems may be lacking.
The Formation Process
The process begins with a warm attic. In an ideally insulated home, the attic should remain close to the outside temperature during winter, preventing the snow on the roof from melting due to indoor heat. However, when attic insulation is insufficient, heat escapes to the roof, melting the snow. Water flows down the slope of the roof, reaching the colder edge and eaves, where it refreezes into ice. As this cycle continues, ice dams grow, preventing proper drainage and potentially causing water to back up under roof shingles and enter the home.
Potential for Water Damage
The implications of ice dams extend beyond the icy exterior. The water that backs up behind the dam can leak into a home, causing damage to walls, ceilings, insulation, and other areas. Over time, this can lead to mold and mildew problems, rotting framework, damaged insulation, and even peeling paint. The costs of repairs from water damage can be significant, making it essential to address the root cause: inadequate attic insulation and ventilation.
 The Importance of Attic Insulation
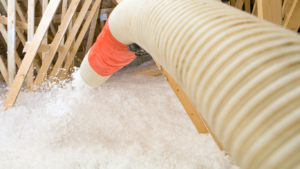
Proper attic insulation and ventilation are key to preventing ice dams. By ensuring that the attic space remains cold, you can prevent the snow on the roof from melting prematurely. Additionally, ventilation helps to remove the heat and moisture from the attic, further reducing the risk of ice dams forming. Upgrading your attic insulation not only mitigates the risk of ice dams but also enhances your home’s overall energy efficiency, leading to lower heating costs and a more comfortable living environment.
Addressing the issue of ice dams at its source—through improved insulation and ventilation—is a proactive step toward protecting your home from potential water damage and achieving a more energy-efficient living space.
Pests in the Attic or Walls
A less often discussed but equally critical sign of insulation issues is the unwelcome presence of pests in the attic or walls. Gaps in insulation not only lead to energy inefficiency but also serve as open invitations for pests such as rodents, insects, and other wildlife to enter your home. These uninvited guests can pose significant health risks and cause structural damage, making it essential to address insulation gaps promptly.
 Entry Points for Pests
Poorly insulated areas often have cracks and openings that are not immediately visible but are large enough for pests to enter. These gaps are typically found around electrical wires, plumbing, ducts, and in attic or wall insulation that has been disturbed or degraded over time. Once inside, pests find a warm and inviting environment, especially during colder months, making your home their shelter and breeding ground.
Health Risks and Structural Damage
The presence of pests in a home is not just a nuisance; it poses serious health and safety concerns. Rodents and insects can carry diseases, trigger allergic reactions, and contaminate food sources. Moreover, pests like termites and carpenter ants can cause significant structural damage to wood components, while rodents are known for chewing through wires, insulation, and even drywall, increasing the risk of electrical fires and further degrading your home’s insulation barrier.
The Importance of Sealing and Insulation
To prevent pests from entering your home, it’s crucial to ensure your insulation is intact and free from gaps. Professional insulation services can not only replace or upgrade your existing insulation but also seal off potential entry points, creating a continuous barrier against both energy loss and pest invasion. By addressing insulation gaps, you’re not just improving your home’s energy efficiency; you’re also protecting it against the health risks and structural damage pests can cause.
Ensuring your attic and walls are properly insulated and sealed is a proactive step toward maintaining a healthy, efficient, and pest-free home.
Conclusion
Recognizing and promptly addressing the signs of inadequate insulation in your home is not just about enhancing comfort; it’s a crucial step toward ensuring energy efficiency, structural integrity, and a healthy living environment. High energy bills, uneven temperatures, cold surfaces, ice dams, and pests are all indicators that your insulation may need attention. While these signs are easy to spot, effectively solving them requires a nuanced understanding of insulation materials and techniques.
We strongly encourage homeowners to consult with a professional for a comprehensive insulation assessment. A thorough evaluation by experts can uncover hidden issues, provide precise solutions tailored to your home’s specific needs, and ultimately save you time and money by preventing future problems.
Call-to-Action: Don’t let insulation issues compromise your home’s comfort and safety. Reach out to us today for an expert evaluation and discover how our insulation solutions can transform your living space into a model of efficiency and comfort.
Sidebar: DIY Tips for Homeowners
While a professional assessment is crucial for comprehensive insulation solutions, there are simple steps homeowners can take to check insulation and seal minor leaks:
- Visual Inspection: Check your attic, basement, and crawl spaces for visible signs of aging or damaged insulation. Look for areas where insulation may have shifted or is missing.
- Draft Test: On a windy day, hold a lit candle or incense stick near windows, doors, and electrical outlets. A flickering flame or smoke movement indicates drafts that need sealing.
- Touch Test: As previously mentioned, use your hands to feel for cold spots on walls, floors, and ceilings, which can indicate areas where insulation is lacking.
- Seal Minor Leaks: Use caulk or expanding foam to seal small gaps around windows, doors, and where pipes or wires enter the house. This can temporarily improve insulation and reduce drafts.
Remember, these DIY checks and fixes can help mitigate immediate concerns, but for a lasting solution that addresses all your insulation needs, consulting with insulation professionals is best. Their expertise can ensure that your home is not only comfortable and energy-efficient but also safe from the hidden dangers of inadequate insulation.
 High Energy Bills
 Uneven Temperatures Between Rooms
 How the Touch Test Works
 Ice Dams on the Roof
 The Importance of Attic Insulation
 Entry Points for Pests
